5 Easy Steps to Add Prefixes in Excel

Adding prefixes to data in Microsoft Excel can be an essential task, whether you're dealing with serial numbers, adding company codes, or improving data organization. Here's how you can achieve this efficiently in just five easy steps:
Step 1: Open Your Excel Workbook
Begin by launching Microsoft Excel and opening the workbook containing the data to which you want to add prefixes.

Step 2: Insert a New Column for Prefixes
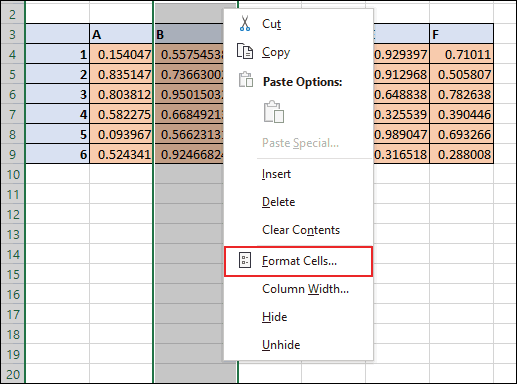
To ensure you keep your original data intact, insert a new column beside the column where your original data resides. Right-click on the column header and select Insert. This will add a column to the left.

✏️ Note: By adding a new column, you preserve the original data, allowing for future adjustments or corrections without affecting the source.
Step 3: Use the CONCATENATE Formula or Ampersand Operator
In the first cell of your new column, enter the formula for concatenation. You can use either:
- The CONCATENATE function:
=CONCATENATE("Prefix", A2)
="Prefix"&A2
Here, "Prefix" represents the text you want to add before your original data, and A2 is the cell reference of your original data.

📝 Note: Both methods will yield the same result, choose based on your familiarity and convenience.
Step 4: Copy the Formula Down the Column
After entering the formula in the first cell, drag the fill handle (the small square at the bottom-right corner of the cell) down to apply the formula to other cells in the column. This action will automatically add the prefix to all the cells in your new column.
⚠️ Note: Ensure your formula references the correct cell range to avoid any issues with data misalignment.
Step 5: Convert Formula Results to Values
With your prefixes in place, you might want to replace the formulas with their resulting values:
- Select the cells with the prefix added.
- Press Ctrl+C to copy them.
- Right-click, select Paste Values from the Paste Special menu or use Alt+E, S, then V and Enter.
This step removes the formulas, leaving only static text that won't change if the source data is modified.

By following these steps, you've successfully added prefixes to your Excel data. This approach enhances data clarity, speeds up identification, and facilitates organized processing of information.
Summing up, adding prefixes to your Excel data can streamline your data management. It's a simple yet powerful technique that can save time and reduce errors when handling large datasets. By adding a column for prefixes, applying the concatenation method, and converting results to values, your data becomes structured and ready for further analysis or use in reporting.
Can I add different prefixes to different cells automatically?
+Yes, by using conditional formatting or more advanced Excel functions like IF or CHOOSE, you can apply different prefixes based on the content of cells in another column.
Will adding a prefix overwrite my existing data?
+No, by inserting a new column for the prefixed data, you keep your original data intact. However, ensure you correctly reference your data cells when creating the formula.
What if I need to remove the prefix later?
+If your prefixes are static values, you can use the LEFT, RIGHT, or MID functions to extract the original data or use the Find and Replace tool to remove the prefix manually.
Related Terms:
- Excel prefix number with text
- add prefix to excel cell
- excel formula to add prefix
- insert suffix in excel
- add prefix to entire column
- adding a suffix in excel


